Excel数字显示E+18怎么恢复正常
9498
2023-11-18
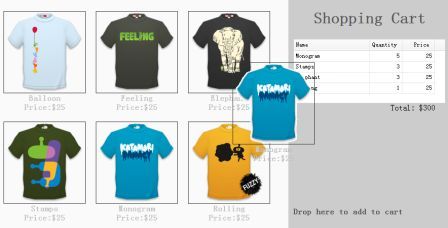
在本文中,我们将向您展示如何创建一个启用用户拖动和放置用户想买的商品的购物车页面,购物篮中的物品和价格将更新,分享给大家,具体内容如下:
效果图:
具体代码如下
显示页面上的商品:
<ul class="products">
 <li>
 <a href="http://www.gimoo.net/t/1904/5cb56f6191bf2.html" class="item">
  <img src="http://www.gimoo.net/t/1904/images/shirt1.gif"/>
  <div>
  <p>Balloon</p>
  <p>Price:$25</p>
  </div>
 </a>
 </li>
 <li>
 <a href="http://www.gimoo.net/t/1904/5cb56f6191bf2.html" class="item">
  <img src="http://www.gimoo.net/t/1904/images/shirt2.gif"/>
  <div>
  <p>Feeling</p>
  <p>Price:$25</p>
  </div>
 </a>
 </li>
 < other products -->
</ul>
正如您所看到的上面的代码,我们添加一个包含一些 <li> 元素的 <ul> 元素来显示商品。所有商品都有名字和价格属性,它们包含在<p> 元素中。
创建购物车:
<div class="cart">
 <h1>Shopping Cart</h1>
 <table id="cartcontent" style="width:300px;height:auto;">
 <thead>
  <tr>
  <th field="name" width=140>Name</th>
  <th field="quantity" width=60 align="right">Quantity</th>
  <th field="price" width=60 align="right">Price</th>
  </tr>
 </thead>
 </table>
 <p class="total">Total: $0</p>
 <h2>Drop here to add to cart</h2>
</div>
我们使用数据网格(datagrid)来显示购物篮中的物品。
拖动克隆的商品:
$('.item').draggable({
 revert:true,
 proxy:'clone',
 onStartDrag:function(){
 $(this).draggable('options').cursor = 'not-allowed';
 $(this).draggable('proxy').css('z-index',10);
 },
 onStopDrag:function(){
 $(this).draggable('options').cursor='move';
 }
});
请注意,我们把 draggable 属性的值从 'proxy' 设置为 'clone',所以拖动元素将由克隆产生。
放置选择商品到购物车中
$('.cart').droppable({
 onDragEnter:function(e,source){
 $(source).draggable('options').cursor='auto';
 },
 onDragLeave:function(e,source){
 $(source).draggable('options').cursor='not-allowed';
 },
 onDrop:function(e,source){
 var name = $(source).find('p:eq(0)').html();
 var price = $(source).find('p:eq(1)').html();
 addProduct(name, parseFloat(price.split('$')[1]));
 }
});
var data = {"total":0,"rows":[]};
var totalCost = 0;
function addProduct(name,price){
 function add(){
 for(var i=0; i<data.total; i++){
  var row = data.rows[i];
  if (row.name == name){
  row.quantity += 1;
  return;
  }
 }
 data.total += 1;
 data.rows.push({
  name:name,
  quantity:1,
  price:price
 });
 }
 add();
 totalCost += price;
 $('#cartcontent').datagrid('loadData', data);
 $('div.cart .total').html('Total: $'+totalCost);
}
每当放置商品的时候,我们首先得到商品名称和价格,然后调用 'addProduct' 函数来更新购物篮。
EasyUI实现拖放商品放置购物车的功能就介绍到这,有了本文为大家提供的实例,相信大家应该很轻松的就可以实现拖放商品放置购物车的模块设计,谢谢大家的阅读。
#免责声明#
本站[绿夏技术导航]提供的一切软件、教程和内容信息仅限用于学习和研究目的;不得将上述内容用于商业或者非法用途,否则,一切后果请用户自负。本站信息来自网络收集整理,版权争议与本站无关。您必须在下载后的24个小时之内,从您的电脑或手机中彻底删除上述内容。如果您喜欢该程序或内容,请支持正版,购买注册,得到更好的正版服务。我们非常重视版权问题,如有侵权请邮件[lxwl@lxwl520.cn]与我们联系进行删除处理。敬请谅解!